
The Freya Top – Free Knitting Pattern

Freya is the goddess of love, fertility, battle, and death in Norse mythology. She’s a badass goddess in my book and she would rock this cropped top.
I was on a cropped top kick, but after making a few, my husband kept telling me they were “cropped” enough for my high waisted shorts. So, I made the Freya Cropped Top to be super cropped, just so I could wear them with my high waisted shorts.
The Freya Cropped Top is constructed from the bottom up. You can easily add more length to vary how “cropped” it is. There is simple shaping and i-cord straps. The lace design is on one side however the top is reversible where the lace side can be worn on the front of the back.
You can purchase a beautifully formatted PDF version of this pattern on Ravelry or Payhip. In the paid version, you will get a 12 page pdf (including the cover page) with stitch charts for the stitch patterns.

PATTERN NOTES
Bottom-up construction.
Worked in one piece with stitches being held on waste yarn or spare needle.
The straps are worked on the back and grafted to the front. They can also be worked from both front & back and grafted at the top.
Long-tailed cast-on without tail yarn estimate: https://youtu.be/qiGPGvn20NE
I-cord using DPN: https://www.youtube.com/watch?v=dfkFRa9tjns
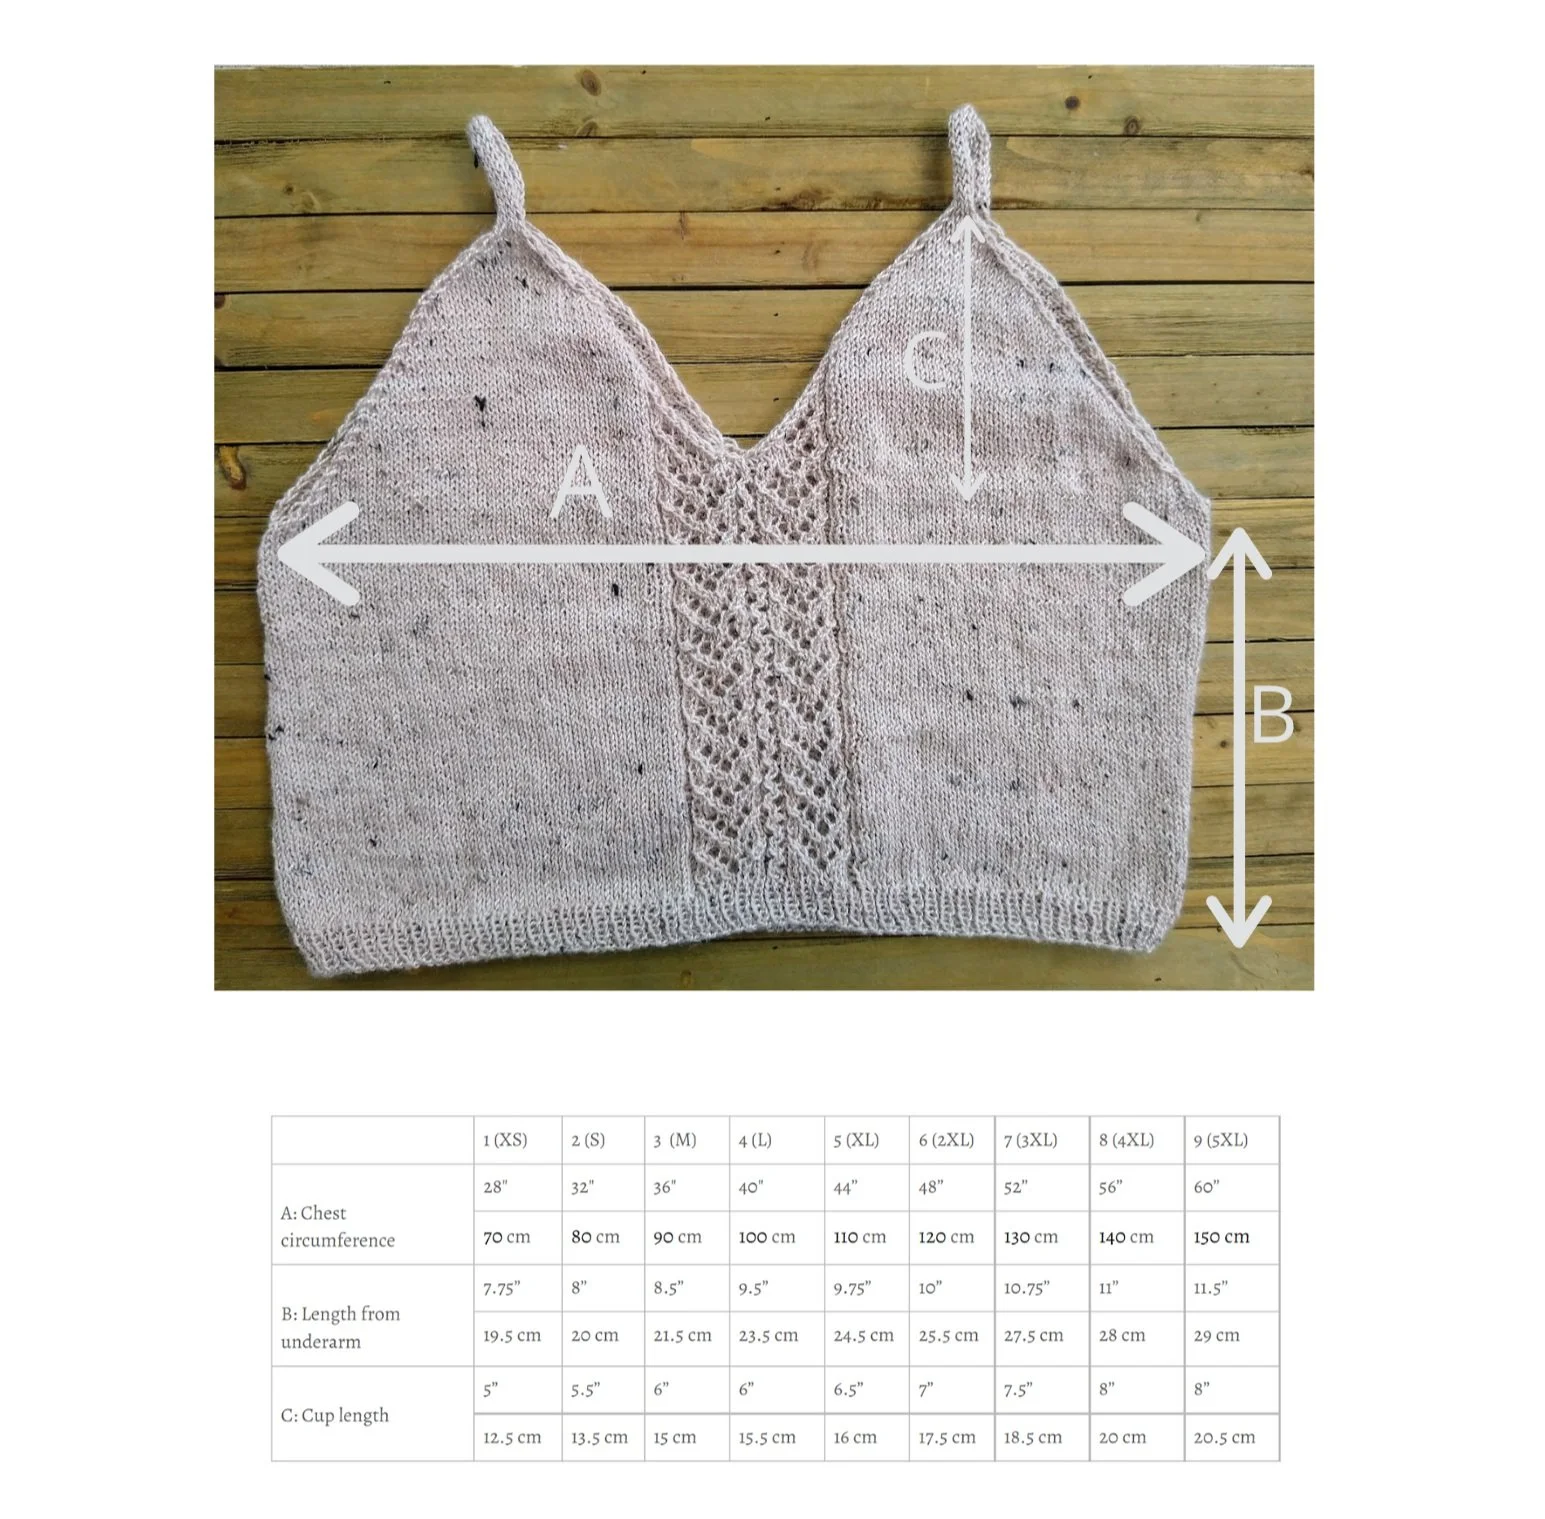
Sample shown in size 2 on 35” chest.
FINISHED BUST CIRCUMFERENCE
Size 1 (XS): 28”/70 cm
Size 2 (S): 32”/80 cm
Size 3 (M): 36”/90 cm
Size 4 (L): 40”/100 cm
Size 5 (XL): 44”/110 cm
Size 6 (2XL): 48″/120 cm
Size 7 (3XL): 52″/130 cm
Size 8 (4XL): 56″/140 cm
Size 9 (5XL): 60″/150 cm
To be worn with 0 – 2″ /0 – 5cm of negative ease
SUGGESTED NEEDLES
Main Body: US 4 (3.5 mm) in 24”/61cm or length preferred.
Ribbing: US 3 (3.25 mm) or 1 size smaller than gauge, in 24”/61cm or length preferred.
Strap: US 3 (3.25mm) or 1 size smaller than gauge double pointed needle (2) or preferred method for i-cord.
GAUGE
27 sts x 38 rows = 4”/10cm with US 4 (3.5 mm) in stockinette stitch
Please be sure to check gauge before as well as during your project to ensure a good fit when the top is completed.
YARN
For sizes: 1 (2, 3, 4, 5) (6, 7, 8, 9)
320 (390, 470, 560, 640) (740, 850, 950, 1060)yards
290 (360, 430, 510, 590) (680, 780, 870, 970)m
Yarn Used: Naluknits Tweed. (Fingering weight; 52% Mulberry Silk, 24% Superkid Mohair, 20% Fine Merino Wool, 4% Viscose; 100g; 437 yards/ 400 meters). 1 (1, 2, 2, 2) (2, 2, 3, 3) skein. Color used: Avocado Dyed.
NOTIONS
Scrap yarn or stitch holder
2 – Stitch markers
2 unique stitch markers for BORM and side marker
Darning needle

STANDARD ABBREVIATIONS
BORM beginning of round marker
CO cast on
cont continue
dec’d decreased
K knit
K2tog knit 2 sts together
P purl
PM place marker
R row
Rnd round
RS right side
sl1 slip 1 st
Sm slip marker
Ssk slip 1, slip 1, knit together thru back loops
Ssp slip 1, slip 1, purl together thru back loops
WS wrong side

STITCH PATTERNS
LACE PATTERN (in the round)
Rnd 1: P2, k3, yo, ssk, k2, p1, yo, ssk, p1, k3, yo, ssk, k2, p2.
Rnd 2 and all even rounds until Rnd 12: P2, k7, p1, k2, p1, k7, p2.
Rnd 3: P2, k1, k2tog, yo, k1, yo, ssk, k1, p1, k2tog, yo, p1, k1, k2tog, yo, k1, yo, ssk, k1, p2.
Rnd 5: P2, k2tog, yo, k3, yo, ssk, p1, yo, ssk, p1, k2tog, yo, k3, yo, ssk, p2.
Rnd 7: P2, k3, yo, ssk, k2, p1, k2tog, yo, p1, k3, yo, ssk, k2, p2.
Rnd 9: P2, k1, k2tog, yo, k1, yo, ssk, k1, p1, yo, ssk, p1, k1, k2tog, yo, k1, yo, ssk, k1, p2.
Rnd 11: P2, k2tog, yo, k3, yo, ssk, p1, k2tog, yo, p1, k2tog, yo, k3, yo, ssk, p2.
Rnd 12: P2, k7, p1, k2, p1, k7, p2.
LEFT FRONT DEC
Note: stitches remaining indicate stitches remaining in lace panel. Please refer to Pattern Instructions for total stitches remaining.
Row 1 (RS): P2, k3, yo, ssk, k1, k2tog, sl1 knitwise. (10 sts)
Row 2 & all even rows until Row 18: P until 2 sts from m, k2.
Row 3: P2, k1, k2tog, yo, k2, k2tog, sl1 knitwise. (9 sts)
Row 5: P2, k2tog, yo, k2, k2tog, sl1 knitwise. (8 sts)
Row 7: P2, k3, k2tog, sl1 knitwise. (7 sts)
Row 9: P2, k2, k2tog, sl1 knitwise (6 sts).
Row 11: P2, k1, k2tog, sl1 knitwise. (5 sts)
Row 13: P2, k2tog, sl1 knitwise. (4 sts)
Row 15: P1, k2tog, sl1 knitwise (3 sts)
Row 17: K2tog, sl1 knitwise. (2 sts)
Row 18: P until 2 sts from m, k2.
RIGHT FRONT DEC
Note: stitches remaining indicate stitches remaining in lace panel. Please refer to Pattern Instructions for total stitches remaining.
Row 1 (RS): Sl1 knitwise, ssk, k1, k2tog, yo, k3, p2. (10 sts)
Row 2 & all even rows until Row 18: K2, p all sts.
Row 3: Sl1 knitwise, ssk, k2, yo, ssk, k1, p2. (9 sts)
Row 5: Sl1 knitwise, ssk, k2, yo, ssk, p2. (8 sts)
Row 7: Sl1 knitwise, ssk, k3, p2. (7 sts)
Row 9: Sl1 knitwise, ssk, k2, p2. (6 sts)
Row 11: Sl1 knitwise, ssk, k1, p2. (5 sts)
Row 13: Sl1 knitwise, ssk, p2. (4 sts)
Row 15: Sl1 knitwise, ssk, p1. (3 sts)
Row 17: Sl1 knitwise, ssk. (2 sts)
Row 18: K2, p all sts.

PATTERN INSTRUCTIONS
SETUP: With smaller needles, CO 188 (216, 244, 268, 296) (324, 352, 376, 404) sts with long-tailed CO. Join into round. Place BORM.
Ribbing: [K1, p1] until end.
Work ribbing for 0.75”/2cm.
BODY OF TOP:
Switch to larger needles.
Setup (marker placement): K36 (43, 50, 56, 63) (70, 77, 83, 90) sts, pm, k22, pm, k36 (43, 50, 56, 63) (70, 77, 83, 90), place unique marker for side of top, k until end of rnd.
Note: LACE PATTERN chart and written instructions can be found under STITCH PATTERNS above.
Rnd 1: K to m, sm, work LACE PATTERN starting at Rnd 1, sm, k until end of rnd, slipping markers as needed.
Work Rnd 1 while continuing to work through LACE PATTERN for approximately 64 (64, 76, 76, 88) (88, 100, 100, 100) times total or until 7.75 (7.75, 9, 9, 10.25) (10.25, 11.5, 11.5, 11.5)”/ 19.5 (19.5, 22.5, 22.5, 25.5) (25.5, 29, 29, 29)cm in length as measured from CO edge, ending on Rnd 4 on LACE PATTERN.

FRONT
We will now split the top and work the front portion flat. You will only be working the first 94 (108, 122, 134, 148) (162, 176, 188, 202) sts on your needle.
Setup R1 (RS): BO 0 (0, 0, 2, 2) (2, 4, 4, 4), ssk, work in pattern as established until last 3 sts before side m, k2tog, sl1 knitwise. (2 (2, 2, 4, 4) (4, 6, 6, 6) sts dec’d).
Setup R2 (WS): BO 0 (0, 0, 2, 2) (2, 4, 4, 4), p until m, sm, k2, p7, k1, p2, k1, p7, k2, sm, p until end. (0 (0, 0, 2, 2) (2, 4, 4, 4) sts dec’d)
R1 (RS): Sl1 knitwise, ssk, work in pattern as established until last 3 sts before side m, k2tog, sl1 knitwise. (2 sts dec’d)
R2 (WS): P until m, sm, k2, p7, k1, p2, k1, p7, k2, sm, p until end.
Work Rows 1 & 2 three times total until 86 (100, 114, 124, 138) (152, 164, 176, 190) sts remain for front.
LEFT FRONT
We will now split the front to work the left side. Remove markers as needed while completing decreases. LACE PATTERN Chart and written instructions for LEFT FRONT DEC can be found above under STITCH PATTERNS.
SETUP (RS): Sl1 knitwise, ssk, k to m, work R1 in LEFT FRONT DEC.
Transfer the remaining 43 (50, 57, 62, 69) (76, 82, 88, 95) sts onto spare needle or waste yarn.
41 (48, 55, 60, 67) (74, 80, 86, 93) sts on needle
Note: Row 1 is a WS and will begin on Row 2 of LEFT FRONT DEC.
R1 (WS): Work LEFT FRONT DEC, sm, p until end..
R2 (RS): Sl1 knitwise, ssk, k to m, cont LEFT FRONT DEC. (2 sts dec’d)
Work Rows 1 – 2 until LEFT FRONT DEC have been completed. 25 (32, 39, 44, 51) (58, 64, 70, 77) sts remaining.
R3 (WS): P all sts.
R4 (RS): Sl1 knitwise, ssk, k until 3 sts from end, k2tog, sl1 knitwise. (2 sts dec’d)
Work Rows 3 – 4 four (three, four, five, four) (five, four, five, six) times total until you have 17 (26, 31, 34, 43) (48, 56, 60, 65) sts remaining.
R5 (WS): P1, p2tog, p until 3 sts from end, ssp, p1. (2 sts dec’d)
R6 (RS): Sl1 knitwise, ssk, k until 2 sts from end, k2tog, sl1 knitwise. (2 sts dec’d)
Work Rows 5 – 6 three (five, six, seven, nine) (ten, twelve, thirteen, fourteen) times total until you have 5 (6, 7, 6, 7) (8, 8, 8, 9) sts remaining. Transfer remaining sts to stitch holder or waste yarn.
RIGHT FRONT
We will now shape the right front of the top. Transfer the remaining 43 (50, 57, 62, 69) (76, 82, 88, 95) sts from front onto your needle. Chart and written instructions for RIGHT FRONT DEC can be found above under STITCH PATTERNS.
Join new yarn to center.
R1 (RS): Work RIGHT FRONT DEC, sm, k until 3 sts from end, k2tog, sl1 knitwise. (2 sts dec’d)
R2 (WS): P until m, work RIGHT FRONT DEC.
Work Rows 1 – 2 until RIGHT FRONT DEC have been completed. 25 (32, 39, 44, 51) (58, 64, 70, 77) sts remaining
R3 (WS): P all sts.
R4 (RS): Sl1 knitwise, ssk, k until 3 sts from end, k2tog, sl1 knitwise. (2 sts dec’d)
Work Rows 3 – 4 four (three, four, five, four) (five, four, five, six) times total until you have 17 (26, 31, 34, 43) (48, 56, 60, 65) sts remaining.
R5 (WS): P1, p2tog, p until 3 sts from end, ssp, p1. (2 sts dec’d)
R6 (RS): Sl1 knitwise, ssk, k until 3 sts from end, k2tog, sl1 knitwise. (2 sts dec’d)
Work Rows 5 – 6 three (five, six, seven, nine) (ten, twelve, thirteen, fourteen) times total until you have 5 (6, 7, 6, 7) (8, 8, 8, 9) sts remaining. Transfer remaining sts to stitch holder or waste yarn

BACK
The back of the top will be formed the same way as the front.
With RS facing, join new yarn.
Setup R1 (RS): BO 0 (0, 0, 2, 2) (2, 4, 4, 4), ssk, work in pattern as established until last 3 sts before side m, k2tog, sl1 knitwise. (2 (2, 2, 4, 4) (4, 6, 6, 6) sts dec’d).
Setup R2 (WS): BO 0 (0, 0, 2, 2) (2, 4, 4, 4), p until end. (0 (0, 0, 2, 2) (2, 4, 4, 4) sts dec’d)
R1 (RS): Sl1 knitwise, ssk, work in pattern as established until last 3 sts before side m, k2tog, sl1 knitwise. (2 sts dec’d)
R2 (WS): P until end.
Work Rows 1 & 2 three times total until 86 (100, 114, 124, 138) (152, 164, 176, 190) sts remain for front.
RIGHT BACK
After completing this section, you will be joining the right back strap to the right front.
Set-up (RS): Sl1 knitwise, ssk, work in pattern as established for 37 (44, 51, 56, 63) (70, 76, 82, 89) sts, k2tog, sl1 knitwise.
Transfer the remaining 43 (50, 57, 62, 69) (76, 82, 88, 95) sts onto spare needle or waste yarn.
41 (48, 55, 60, 67) (74, 80, 86, 93) sts on needle
R1 (WS): P all sts.
R2 (RS): Sl1 knitwise, ssk, work in pattern as established until 3 sts from end, k2tog, sl1 knitwise. (2 sts dec’d)
Work Rows 1 – 2 twelve (eleven, twelve, thirteen, twelve) (thirteen, twelve, thirteen, fourteen) times total until you have 17 (26, 31, 34, 43) (48, 56, 60, 65) sts remaining.
R3 (WS): P1, p2tog, p until 3 sts from end, ssp, p1. (2 sts dec’d)
R4 (RS): Sl1 knitwise, ssk, k until 3 sts from end, k2tog, sl1 knitwise. (2 sts dec’d)
Work Rows 3 – 4 three (five, six, seven, nine) (ten, twelve, thirteen, fourteen) times total until you have 5 (6, 7, 6, 7) (8, 8, 8, 9) sts remaining.
STRAP
We will be using the i-cord to form the strap to join the RIGHT BACK to the 5 (6, 7, 6, 7) (8, 8, 8, 9) sts from RIGHT FRONT. As you’re forming the strap, try on the top periodically to get the strap length you need for the top to fit. Keep in mind, the i-cord will stretch once blocked and with wear
Using DPN and smaller needle, k 5 (6, 7, 6, 7) (8, 8, 8, 9) sts. Slide the sts to the other side of DPN and repeat until strap is 4”/ 7.5cm long or length desired for your body. Cut yarn leaving about 8-10”/ 20-25cm tail. Using kitchener st, graft straps from RIGHT FRONT and RIGHT BACK together.
LEFT BACK
After completing this section, you will be joining the left back strap to the left front strap.
Repeat section titled “RIGHT BACK.”
STRAP
The strap will join the LEFT FRONT to the LEFT BACK . Otherwise, repeat the same instructions as provided for RIGHT BACK.
FINISHING
Weave in ends and block to measurements.
FINISHED MEASUREMENTS
You can purchase a beautifully formatted PDF version of this pattern on Ravelry or Payhip. In the paid version, you will get a 12 page pdf (including the cover page) with stitch charts for the stitch patterns.
Ravelry
Payhip
SOCIAL MEDIA
If you post on social media, please be sure to tag me @naluknits and use the hashtag #naluknits and #freyatop so I can see all your beautiful knits!
REPRODUCTION OF PATTERN
Please do not distribute, copy or resell this pattern or any portion of this pattern.
SELLING OF FINISHED PRODUCT
You may sell handmade finished products however I kindly ask you to please provide pattern credit and design to Naluknits.
