Habee Baby Cardigan – Free Knitting Pattern
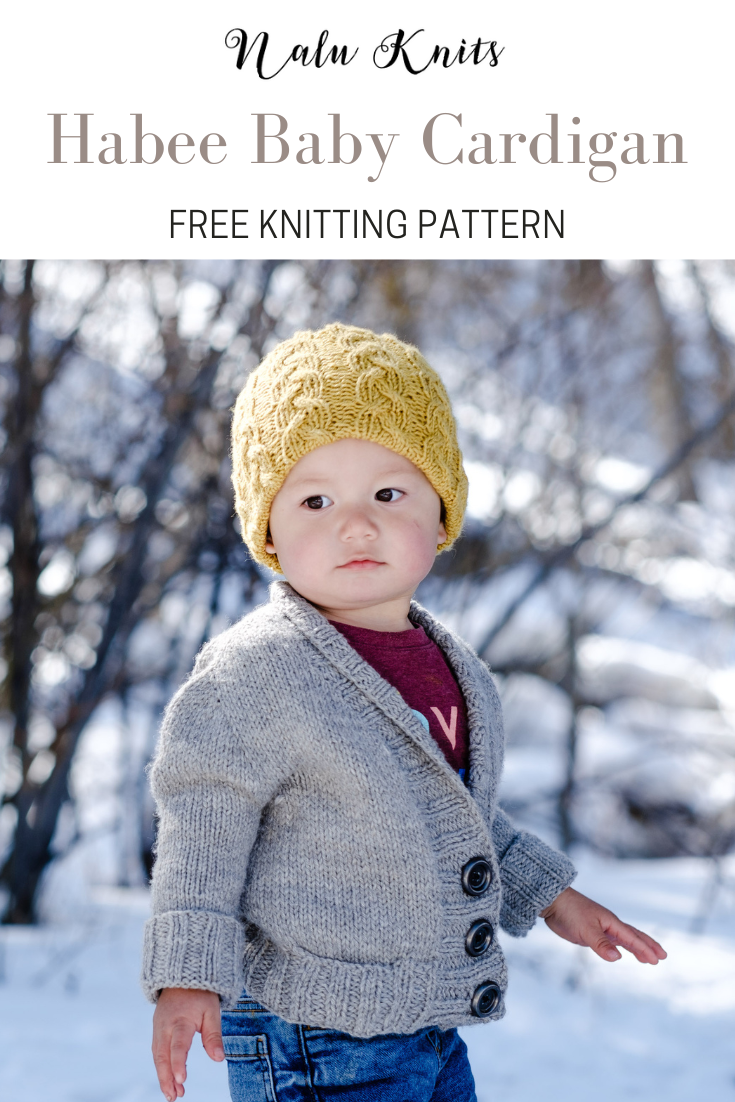
The Habee Cardigan is a seamless, top-down sweater construction with small pockets for little treasures.

“Habee” is a shortened way of saying of grandfather in Korean. It is what my son lovingly calls my father. This cardigan was named after him and gives a true grandfather vibe – classic and timeless.
Show me a person who doesn’t think babies look adorable in cardigans. There’s something so cute about how grown up they look when they’re thrown into a cardigan. Like they’re little old men who are getting ready to read books by the fireplace while sipping their tea.
For this cardigan, I wanted to make a matching cardigan set – one for baby and one for mommy. So I used a classic silhouette with simple stitches and shaping.
The toddler (age 2) size is available for FREE on this blogpost (scroll down). The paid version of the Habee Children’s Cardigan has 2 different options for pockets as well as buttons. It includes instructions for sizes ranging from age 2 to age 14.
Purchase the Habee Children’s Cardigan in my Ravelry or Payhip store for a beautifully formatted PDF in a range of sizes for children.

Habee Children’s Cardigan
The Habee Cardigan is a seamless, top-down sweater construction with small pockets for little treasures. There is an option to build the pockets right into the sweater or to have the pockets built into the collar of the sweater. This sweater is perfect for layering when the weather is chilly, but not cold.
The Habee Sweater is a top-down sweater with set-in sleeves using Susie Myer’s contiguous sleeve method. It is knit in one piece with stitches being held for the sleeves on waste yarn. The collar is picked up with the option for buttonholes or pockets built into the collar.
Pattern Information:
Seamless, top-down construction
Stitches are held for sleeves which are later picked up and knit
The collar is picked up along edge of neck and worked in ribbing
There are two options for pockets: built into body of cardigan or into the collar
There is an option for buttonholes
Video for stabilizing neck: Fix sweater shoulders/neck that are too stretchy // Technique Tuesday – YouTube
Sample is size 2 on 19”/48cm chest circumference.
Materials:
Main Body: US 8 (5mm) in 24”/60cm or length preferred.
US 8 (5mm) double pointed needles or preferred method for sleeves.
Ribbing: US 7 (4.5mm) in 24”/60cm or length preferred.
Ribbing for sleeves: US 7 (4.5mm) double pointed needles or preferred method for sleeves.
Notions:
Scrap yarn or stitch holder
6 – Stitch marker
Darning needle
Optional Buttons: 3 – 1” (2.5cm) buttons
Finished size:
23.25 / 59cm bust circumference
To be worn with 0″ – 3” [0 – 7.5cm] of positive ease
Gauge:
17 sts x 21.5 rows = 4”/10cm with US 8 (5 mm) in stockinette stitch, blocked
Yarn:
360 yards / 330m
Yarn used:
PurlSoho Linen Quill Worsted. (Worsted Weight; 50% Fine Highland Wool, 35% Alpaca, and 15% Linen; 100g; 164 yards/ 150 meters). 3 skeins. Color used: Stonewall Gray.

ABBREVIATIONS
[ ]: repeated section
BO: bind off
BORM: beginning of round marker
CO: cast on
dec(s): decrease(s)
inc’d: increased
K, k: knit
k2tog: knit 2 sts together
LN: Left Needle
m: marker
M1L: make 1 left: From the front, lift the horizontal strand between stitches with the left hand needle and knit through the back loop (inc 1)
From the front, lift the horizontal strand between stitches with the left hand needle and purl through the back loop (inc 1)
M1R: make 1 right: From the back, lift the horizontal strand between stitches with the left hand needle and knit through the front loop (inc 1)
From the back, lift the horizontal strand between stitches with the left hand needle and purl through the front loop (inc 1)
P, p: purl
pm: place marker
PU: pick up & knit
R: row
Rnd: round
RS: right side
sl: slip stitch
sm: slip marker
ssk: slip 1, slip 1, knit together thru back loops
st(s): stitch(es)
St st: stockinette stitch
WS: wrong side

PATTERN INSTRUCTION
With larger needles and knitted cast-on (or preferred cast-on method), CO 21 sts.
Marker Placement: k1, pm, k2 for shoulder seam, pm, k3, pm for neck, k until 6 sts left, pm, k3, pm, k2 for shoulder seam, pm for front, k1.
SHOULDER & NECK INCREASES
R1 (WS): p to m, M1Lp, sm, p2, sm, M1Rp, [p to m, sm] two times, p to m, M1Lp, sm, p2, sm, M1Rp, p to end. (4 sts inc’d)
R2 (RS): k to m, M1R, sm, k2, sm, M1L, k to m, sm, M1R, k to m, M1L, sm, k to m, M1R, sm, k2, sm, M1L , k to end. (6 sts inc’d)
Work R1 & R2 once more.
R3 (removing neck markers): p to m, M1Rp, sm, p2, sm, M1Lp, p to m, remove m, M1Rp, p to m, M1Lp, remove m, p to m, M1Rp, sm, p2, sm, M1Lp, p to end. (6 sts inc’d)
Total sts: 47
Front: 6 sts
Back: 31 sts
Shoulder: 2 sts at each shoulder
SHOULDERS
R1 (RS): k to m, M1R, sm, k2, sm, M1L, k to m, M1R, sm, k2, sm, M1L, k to end. (4 sts inc’d)
R2 (WS): p to m, M1Lp, sm, p2, sm, M1Rp, p to m, M1Lp, sm, p2, sm, M1Rp, p to end. (4 sts inc’d)
Work R1 & R2 three times total.
Total sts: 71 sts
Front: 12 sts
Back: 43 sts
Shoulder: 2 sts at each shoulder

SET-IN SLEEVES
Note: We will be moving the markers to mark the sides of the sleeves.
Setup Row (RS): [k to 1 st before m, sl1, remove m, sl st back to LN, pm, M1L, k3, remove m, k1, M1R, pm] twice, k to end.
Sleeves (sts between markers): 6 sts for each sleeve
Front: 11 sts
Back: 41 sts
R1 (WS): p1, M1Rp, [p to m, sm, M1Rp, p to m, M1Lp, sm] twice, p until 1 st from end, M1Lp, p1. (6 sts inc’d)
R2 (RS): k1, M1L, [k to m, sm, M1L, k to m, M1R, sm] twice, k until 1 st from end, M1R, k1. (6 sts inc’d)
Work R1 & R2 three times total.
Sleeve sts: 18
Front sts: 17
R3 (WS): p all sts.
R4 (RS): k1, M1L, [k to m, sm, M1L, k to m, M1R, sm] twice, k until 1 st from end, M1R, k1. (6 sts inc’d)
Work Rows 3 & 4 four times total.
Total sts: 135
Sleeve: 26 sts
Front: 21 sts
Continue to work in stockinette stitch until armhole depth (beginning of the set-in sleeves to underarm) measures to 6.25” / 16 cm or desired depth, ending with a WS row.

SEPARATION OF BODY AND SLEEVES
K 21 sts for front, sl 26 sts for sleeve onto waste yarn, CO 2 sts for underarm, k 41 sts for back, sl 26 sts for sleeve onto waste yarn, CO 2 sts for underarm, K 21 sts for front.
Total sts: 87
BODY
Work body of cardigan in St st until 6“ / 15 cm from underarm, ending on WS row.
RIBBING:
R1 (RS): K1, [p2, k2] until 1 st remains, p1.
Work R1 & R2 until ribbing is 2” / 5 cm long then BO in pattern.
SLEEVES
With larger needles, starting at underarm, PU 1 sts, transfer 26 sleeve sts from waste yarn to working needle and knit, PU 1 sts. Join into round and place BORM.
Total sts on needle: 28
Work in St st until 4“ / 10 cm long from underarm.
Dec Rnd: Ssk, work in St st until 2 sts from end, k2tog.
Work in St st for 5 rows.
Work last 6 rows 2 times total.
Cont in St st until 7.5” / 19 cm or 2”/ 5 cm shorter than desired length.
Total sts: 24
Ribbing: Switch to smaller needles.
Rnd 1: [k2, p2].
Work until ribbing is 2”/ 5 cm long then BO in pattern.
Repeat for other sleeve.

COLLAR
Note: When picking up stitches, pick up about 3 stitches for every 4 rows. Any amount of stitches may be picked up as long as it is divisible by 4 with 2 extra stitches.
With smaller needles and RS facing out, starting at bottom right of cardigan, evenly PU 48 sts along side of cardigan then PU 22 from initial cast-on and evenly PU 48 sts along other side of cardigan.
Total sts: 118
R1(WS): p2, [k2, p2].
R2 (RS): k2, [p2, k2].
Work ribbing until 2.5” / 7.5cm long. BO in pattern.
FINISHING
Weave in ends and block to measurements
Purchase the Habee Children’s Cardigan in my Ravelry or Payhip store for a beautifully formatted PDF in a range of sizes for children.